In this post, I will go through how to setup OpenSSH, secure your keys, set up SSH Tunnel, socks proxy, use jump hosts and batch mode is ssh.
- Installing SSH
- Enabling SSH service
- Hardening SSH login
- Securing SSH keys
- Tunneling
- Jump servers
- Tunnel + Jump servers
- Running SSH in Batch mode
Installing SSH
- For Linux,
sudo apt install openssh-server - For Mac, SSH is already installed.
- For Windows, in powershell with elevated access
Add-WindowsCapability -Online -Name OpenSSH.Server~~~~0.0.1.0
Note: For windows you can verify if it installed or not by using Get-WindowsCapability -Online | Where-Object Name -like 'OpenSSH*'
Enabling SSH service
- For Linux,
sudo systemctl enable ssh sudo systemctl start ssh - For macOS, open “System Preferences” => Sharing => enable “Remote Login” (You can restrict access to specific
users.). You can also enable it through a command line like below
sudo systemsetup -setremotelogin on - For Windows, in PowerShell with elevated access.
# Start the sshd service
Start-Service sshd

# OPTIONAL but recommended:
Set-Service -Name sshd -StartupType 'Automatic'
Hardening SSH login
Hackers might be running scans on public hosts/ips on the default SSH port, so it is recommended to have the below settings, before you start ssh server (sshd). There are a couple of settings that can be done to harden SSH login.
- Disable Root login (Make sure you have a valid user with sudo permissions created)
- Disable password authentication
- Enable public-key authentication
- Change default to port
22For Linux and MacOS, the config file is/etc/ssh/sshd_config, For Windows, the config file is ` %programdata%\ssh\sshd_config(mostlyC:\ProgramData\ssh\sshd_config`).
Have below settings in the ssh config file
PermitRootLogin no
PasswordAuthentication no
AuthenticationMethods publickey
PubkeyAuthentication yes
ChallengeResponseAuthentication no
Port 2222
For Linux, reload sshd daemon
sudo systemctl reload sshd
For MacOS, reload sshd like below
sudo launchctl unload /System/Library/LaunchDaemons/ssh.plist
sudo launchctl load -w /System/Library/LaunchDaemons/ssh.plist
Securing SSH keys
Linux and MacOS
Usually, if you are using ssh-keygen, it will create ~/.ssh folder with keys with correct permissions.
If you want to copy your existing keys, you need to set proper permissions for keys to work.
mkdir ~/.ssh
chmod 700 ~/.ssh
chmod 600 ~/.ssh/authorized_keys
chmod 600 id_rsa
chmod 644 id_rsa.pub
Windows
You can use cd $env:USERPROFILE\.ssh; ssh-keygen.exe to generate keys. Your keys would be at $env:USERPROFILE\.ssh
You can also create authorized_keys file - cd $env:USERPROFILE; mkdir .ssh; cd .ssh; New-Item authorized_keys;
To use existing keys,
cd $env:USERPROFILE:\.sshgo to.sshfolder- Run
start .to open explorer with the current folder ($env:USERPROFILE.ssh); - Right-click authorized_keys, go to Properties -> Security -> Advanced
- Click “Disable inheritance”
- Choose “Convert inherited permissions into explicit permissions on this object” when prompted
- Remove all permissions on file except for the SYSTEM and yourself. There must be exactly two permission entries on the file. Some guides suggest running the Repair-AuthorizedKeyPermission $env:USERPROFILE.ssh\authorized_keys - this will try to add the sshd user to the permission list will break the authentication, so don’t do that. Both SYSTEM and yourself should have full control over the file.1
Tunneling
Accessing remote application
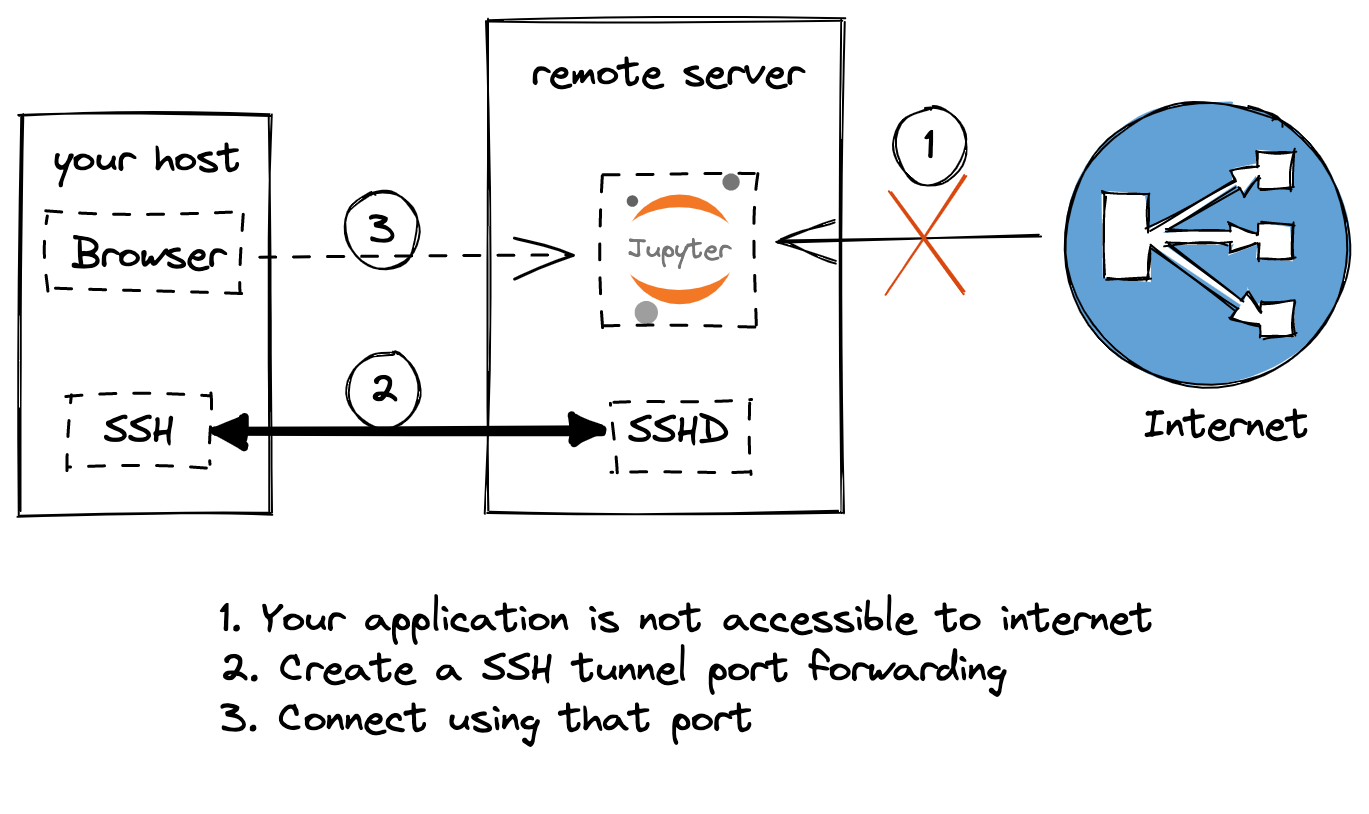
If you want to access an application on a remote port, you can use SSH Tunneling without opening the port to the public.
For example, if you have a Jupyter notebook running at port 8888 in your remote host,
you can run the below command in your current host and access it through localhost:8888.
ssh -N -f -L localhost:8888:localhost:8888 user@remote-server -p 2222
If you want to do RDP to a remote machine, you can do to like below
ssh -N -f -L localhost:3389:localhost:3389 user@remote-server -p 2222
In your RDP client, you can use localhost with port 3389 to do RDP.
Socks Proxy
You can create socks proxy using the below command and route all your network traffic through the remote host.
ssh -D 8889 -f -C -q -N user@host
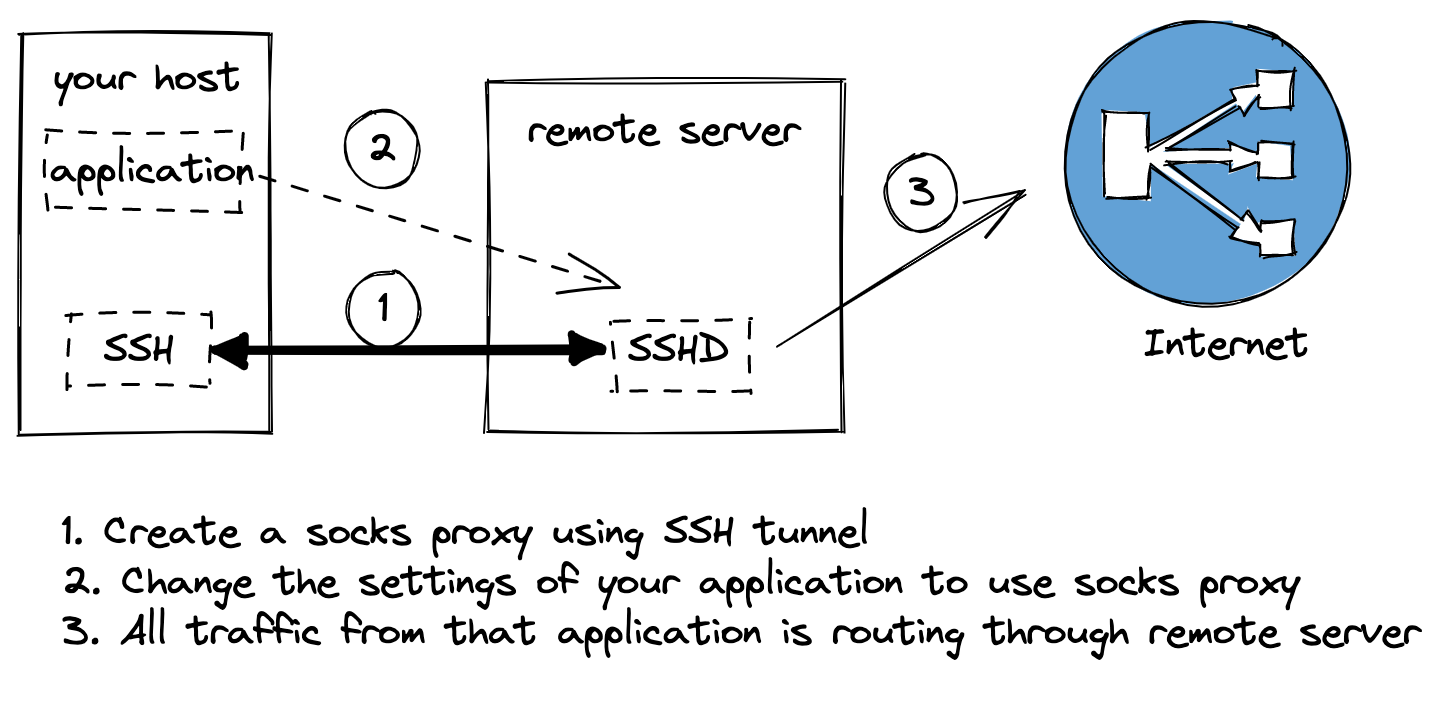
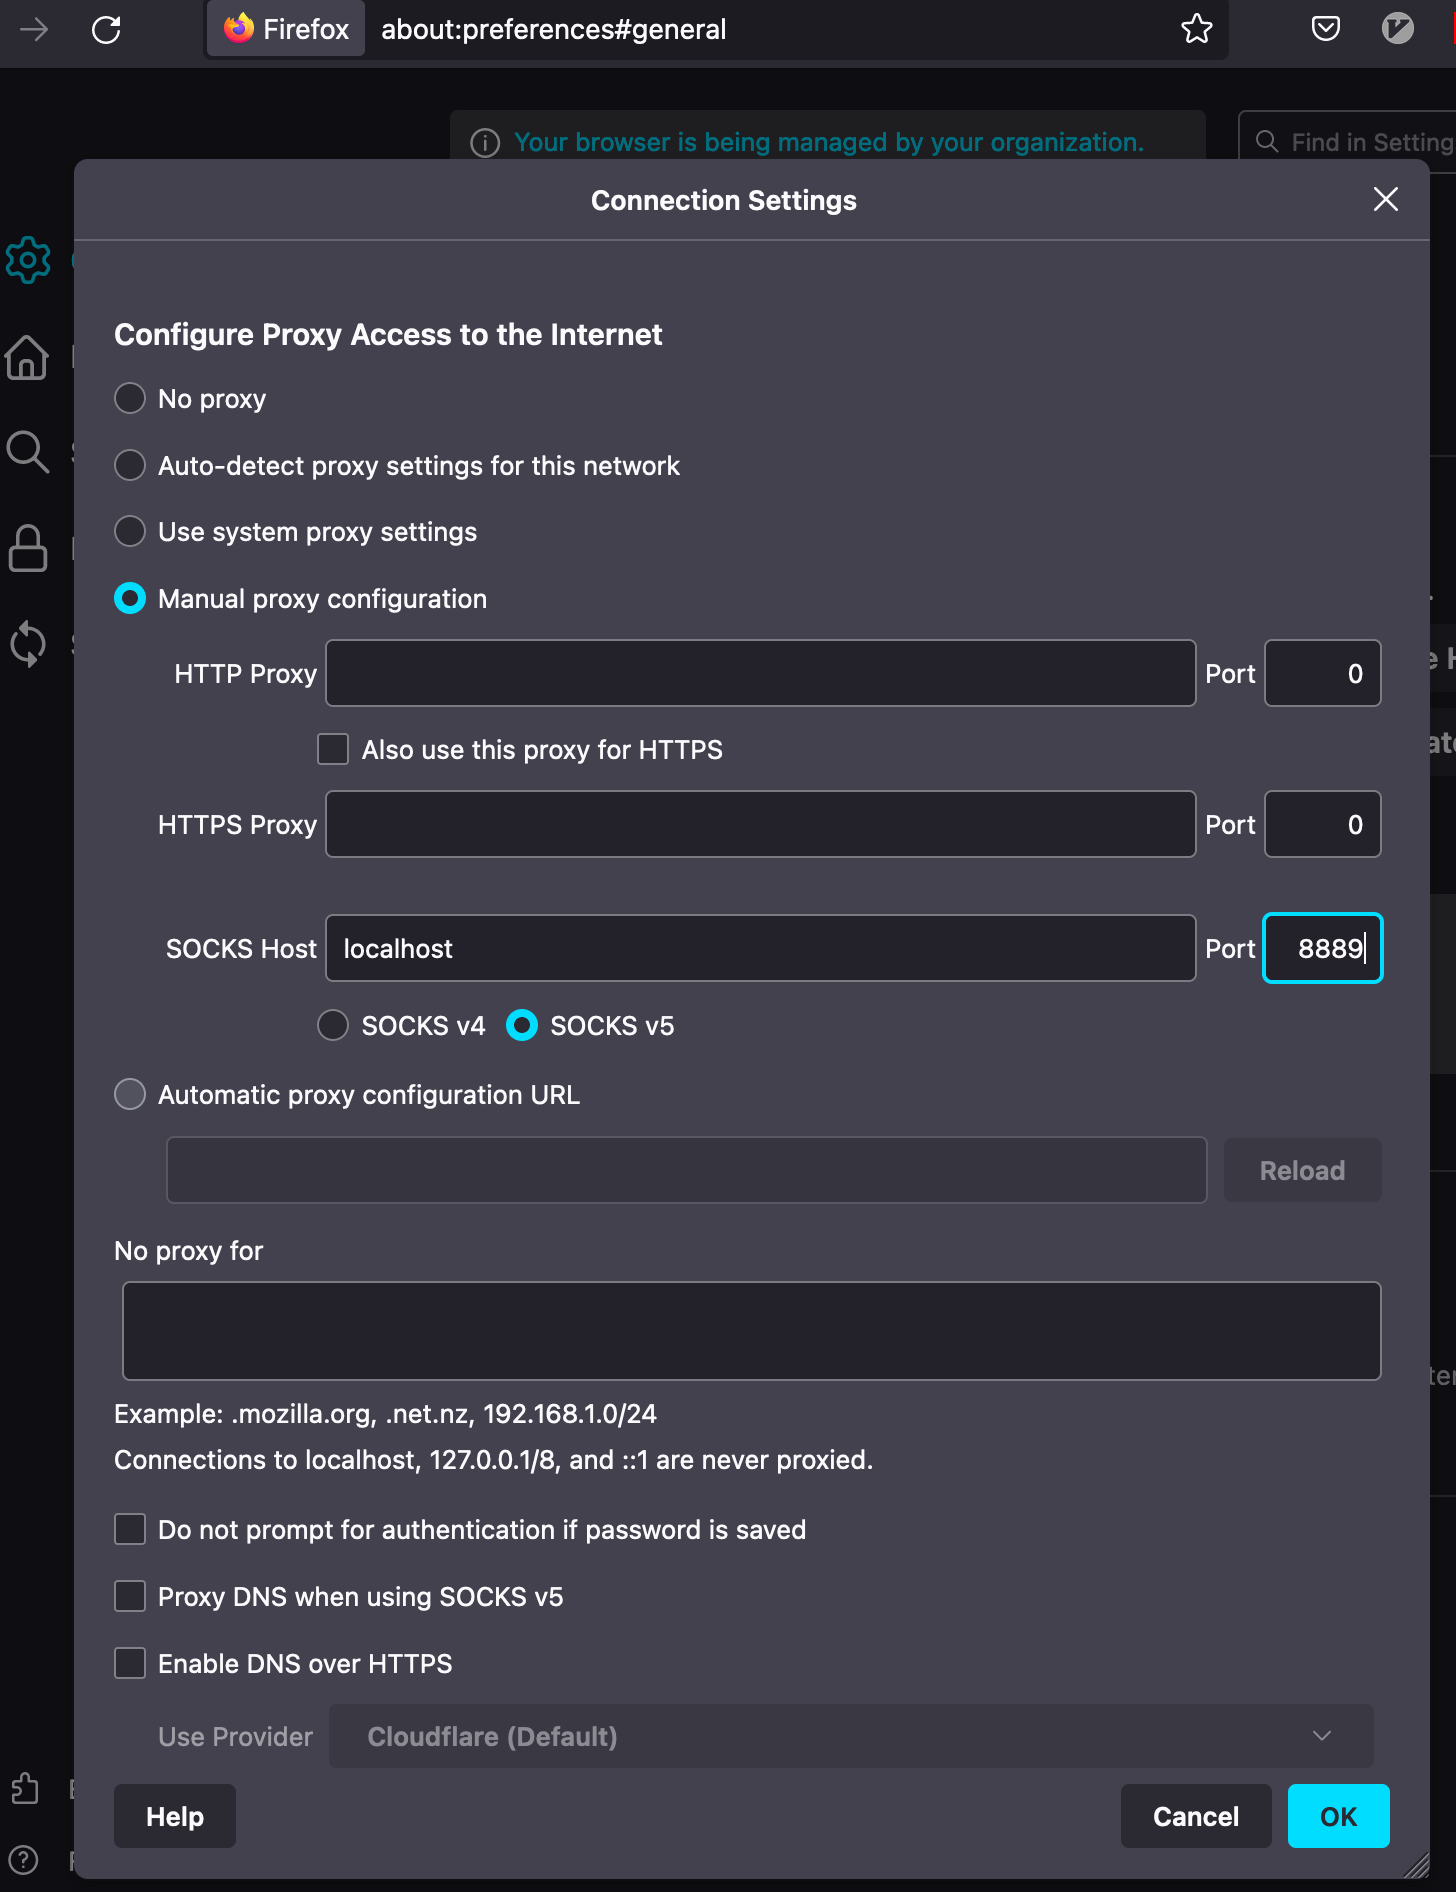
Now you can go to any application which supports socks proxy and give localhost and 8889 to route traffic. Below is for firefox browser to route traffic through socks proxy.
To stop SSH Tunneling, find the ssh tunnel process and kill it with kill -9
ps -ef | grep ssh
Jump servers
You can use jump servers to log in to a blocked host.
ssh -J user@jump-host user@blocked-host
You can do multiple jumps
ssh -J user@jump-host1,user@jump-host2 user@blocked-host
For older versions, where you don’t have -J option, you can use ProxyCommand
ssh -v -o ProxyCommand="ssh -W %h:%p user@jump-host" user@blocked-host
Tunnel + Jump servers
Accessing remote application
ssh -v -N -J user@jump-host user@blocked-host -L 5433:azure.database.com:5432
Socks Proxy
ssh -D 8889 -f -C -q -J user@jump-host -N user@blocked-host
Running SSH in Batch mode
If you are using ssh in batch mode, you can use the below options
- set
ConnectTimeoutin seconds. If the remote server is not responding, go to the next one. - set
UserKnownHostsFileto/dev/nullto avoid prompts to add to known host file - set
LogLeveltoERRORto restrict logging to errors - set
StrictHostKeyCheckingtonoto avoid key checking - set
BatchModetoyes; if your key is not added toauthorized_keys, then it will error and continue to the next host.
Below is one example of running ssh in batch mode.
$ cat cpu.sh
#!/bin/bash

# iterate through each host
for i in "$@"
do
    ssh -o ConnectTimeout=10 \
        -o UserKnownHostsFile=/dev/null \
        -o LogLevel=ERROR \
        -o StrictHostKeyChecking=no \
        -o BatchMode=yes \
        user@$i 'sar -u 1 1 | tail -1' | awk -v vip="$i" '{print vip" "100 - $8"%"}'
done

$ ./cpu.sh host1 host2
I hope this helps.
– RC
-
https://github.com/PowerShell/Win32-OpenSSH/issues/1126 ↩


Comments